Tuesday, August 11, 2009

Change Start Button Text

I always wanted to change the text of my Start Button ever since I have been using the Windows operating System.Create a system restore point just incase if something goes wrong you can roll back to the original settings. Make a back up copy of explorer.exe in a safe place, maybe in a different folder.
Open Resource Hacker utility. Click on File ---> Open. Type "explorer.exe" in the text box.
Expand String Table ---> 37 from the tree view and click on 1033 as shown in the figure below

From the right window next to where start is written in front of 578 edit the text to what you want on your start button. For example I edited it to SreejithThampyR as shown in the figure below:


Click on the "Compile Script" button on top of the right window. Now click on File ---> Save as ----> wintipz.exe as shown in Figure Below
Open registry editor by clicking on Start ---> Run and typing "regedit" at the text box. Navigate to HKEY_Local_Machine -> Software -> Microsoft -> Windows NT -> CurrentVersion -> Winlogon


Restart your computer to see the changes.


Wednesday, August 5, 2009

Install Windows XP on SATA without a Floppy

SATA drives provide more speed which determines the system to run smoother. Thus, for those owning older mainboards with SATA support an extra step is required while attempting to install Windows XP. Windows XP does not provide drivers for all the SATA controllers, therefore, during the installation procedure, the user must insert a floppy with the drivers that came in the package along with the motherboard.
In that floppy installation first thing we need a floppy drive ,most of the users may don't have a floppy drive.We also need to take care of the Windows Xp Service pack cd's and the floppy with the drivers.Now we have a solution for that in which we create a custom Windows Xp cd using Nlite
In that method we dont need the floppy drivers or floppy with the drivers either.Kool right ya goahead and format your SATA drive without floppy.
To do the trick I have been talking about, it is assumed that you already have a Windows installed on an IDE drive. In case you don't, pay a visit to a friend and ask him to let you use his computer. It won't take too much time, I guarantee.
For doing the process , store the drivers in a desired location. Then download and install the Nlite application. When you start the Nlite application, you will be asked to provide the location for the Windows installation package. Insert the genuine Windows Installation CD into the CD drive and, inside the application, select the CD drive letter.

To insert the SATA drivers within the installation package, you need to have it saved on the HDD. Hence, when the warning window appears click OK and select the destination folder for the files to be saved.


Great now you are ready to go ,the new CD will be the same copy of the Windows Installation CD but with one difference, it includes the SATA driver.Now you are ready to format with out a floppy.

Installation of XP: Error Setup did not find any hard disk drives installed in your computer

While installing windows xp using normal windows xp service pack cd in your SATA drive there might occur an error that "Setup did not find any hard disk drives installed in your computer".The solution for this can also found in the computer bios itself (important: every system not necessoraly have this solution in there bios).Follow the instructions given below .

To change the SATA Mode to IDE go to
Integrated Peripherals > SATA Devices Configuration > SATA Mode [raid] and change to [ide]

Then try installing the xp cd as normal installation.

Services.msc process

Services load and start running whether or not anyone logs into the computer, unlike a program that is launched from the Startup Folder under All Programs.

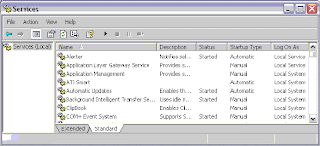
There are two ways to view Services on your computer. The first is to use the MS Configuration Utility by typing msconfig.exe in the Run box accessed via the Start Menu, followed by clicking the Services tab. If you want a quick visual of which items are running or stopped, this is fine, but the information is limited. The preferred way to make changes to services is to launch services.msc from the Run option on the Start Menu. The Services window shown below will open


Looking at the Services window you can see it has columns for Name, Description, Status, Startup Type and Log On As. This provides a quick overview of all the services on your computer. Detailed information is available by clicking any of the entries.

similar entries on run:- msconfig , gpedit.msc , drwatson ,regedit , dxdiag.exe ,services.msc

msinfo32->sys info short cut
win key+u+u->shutdown<-altf4

Ubuntu 'drdy' ERROR

When hard drive is connected Ubuntu won't boot. If get an error screen which reads:

[272.854943] ata2.00: status: {DRDY err}
[xxx.xxxxxx] ata2.00: error: {UNC}
[xxx.xxxxxx]ata2.00: exception Emask 0x0 SAct 0x0 SErr 0x0 action 0x0
[xxx.xxxxxx] ata2.00: BMDMA stat 0x24
[xxx.xxxxxx] ata2.00: cmd c8/00:08:00:00:00/00:00:00:00:00/e0 tag 0 dma 4096 in

the x's are all different numbers. The message repeats several times. Sometimes it says Buffer I/O error on device sdb1, logical block x (where x is a changing number)
The drdy error means "Disc Ready error".
Try burn the live cd, SystemRescueCD although any live cd with the right tools should work.

Then run:
e2fsck -f -c -v /dev/sda1

substituting /dev/sda1 with your device with the error.

This will force a check of the drive even if fsck believes the drive is ok.

Create One-Click Restart icon on your desktop

You can set the time when your computer will start the restart process. A single click on Restart icon will close the all running applications and start the restart properly after predefined time. This tip is very useful to save power and time as well. After the execution of this command, a small window will appear to start count time of system restart.
To create a new shortcut, right click on any empty area of your desktop and go to New then Shortcut.
Now a small windows dialog box will appear with the title "Create Windows". In the "Create Shortcut" window, type the following command.

SHUTDOWN -r -t 30


Here t 30 means time in second, for example if you want your computer will restart automatically after half minute then the command will be shutdown -r -t 30. But if you want your computer will restart without any countdown then type command as shutdown -r -t 00.
This command starts a 30-second countdown for restart, which permits you to abort it (with a shutdown -a command).
At the end, when you click on restart icon, a windows dialog box will appear with the information" This system is shutting down. Please save all work in progress and log off. Any unsaved changes will be lost. This shutdown was initiated by administrator".

Disabling Drives in My Computer

To disable the display of local or networked drives when you click My Computer.
Run registry (regedit)goto HKEY_CURRENT_USER\Software\Microsoft\Windows\CurrentVersion \Policies\Explorer Now in the right pane create a new DWORD item and name it No Drives.
Now modify it's value and set it to 3FFFFFF (Hexadecimal). Now press F5 to refresh.When you click on My Computer, no drives will be shown. To enable display of drives in My Computer, simply delete this DWORD item.

*ps -Its a registry trick .Make sure you are well versed in registry areas.

Display the hidden secret of iPhone mobile phones

This will help you to enjoy some secret codes of iPhone mobiles.

Code Action

*#61# and tap Call To verify the number of unanswered calls

*#62# and tap Call Use to verify the number for call forwarding

*#06# To display the IMEI Number of the mobile

*777# and tap Call To display the account balance information for prepaid iPhone

*225# and tap Call To display the account balance information for Postpaid iPhone

*#67# and tap Call To display the number for call forwarding when the iPhone is busy

*3001#12345#* To display many of the inner settings of your iPhone

*#21# To verify the call forwarding is enabled or disabled

*646# and tap Call To display the Post-paid minute balance

*#33# and tap Call To Check for call control bars

Resolve MS Office 2007compatibility Issue

Mostly by default all Microsoft Office 2007 applications use the different files extensions than the earlier versions. All earlier Office applications used the file extensions as .doc, .xls and .ppt for Word, Excel and PowerPoint respectively, but now Office 2007 applications uses the .docx, xlsx and .pptx file extensions for Word, Excel and PowerPoint respectively. These all new file extensions are not compatible with all previous versions of Office applications, that is why Office 2002 and Office 2003 applications cannot open and read the .docx, xlsx and .pptx file extensions.

However, you have an option in Office 2007 to save the files with in older files extensions, But if you are frequently using the older versions of the file and also if the files created by you are to be shared on other computers which have earlier versions of Office, you may want to save all your new documents in the older format, but that would create duplicate files. There is better option in Office 2007 applications to change the default saving file format to the older format and then the new file format in Office 2007 will be changed to .doc, .xls and .ppt for Word, Excel and PowerPoint respectively.

Today we will set the older file format for Word 2007 and other applications will be discussed in the next tips. Follow the given steps to set the default older file format for Word 2007:

First click on Start button, go to Program then click on Microsoft Word 2007 to run the word application.

Now click on File menu in the top left corner then click on Word Options button to change the default word options.


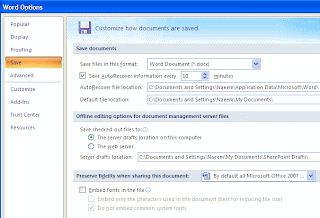
Here find the "Save File in this format" option and click on drop down box to select the different format. Now you will find many options here, select the Word 97-2003 Document (*doc) option.

Now click on Ok button to save the settings and all new Word files will be created in the format you set as default.

Thats all folks , this problem resolved.


counter


Guests


Locations of visitors to this page